Tuesday, March 26, 2013

Easter Greetings


I made this card about a week prior i had the newest Easter stamps... i hope you still like it even if it does not use the very newest "stuff" :-) I had a play with watercolors. Really different, its hard for me to go light on inks, although i would like my picture to be paler and more romantic. I think thats just me that i do go for the bright intense color. I think recently i got also a bit bored with the regular things and was just looking for a change. I think you may have noticed that because i make many more 3 D items than what i used to make.

For my card i used Fabriano hot pressed watercolor paper as i am really happy with this choice i read on some blogs about the Langton paper and i am super excited to see that Sir Stampalot has it now for sale, as i was not able to locate the paper anywhere i felt comfortable to order overseas.,
I really want to give this paper a try.

For those of you who do not recognize the stamps or just recently started with Magnolia stamps.. here are the names of the images.
Tilda is Tilda with Tulips and Floral background 

post signature

Sunday, March 17, 2013

Magnolia Nautical Shadow Box

Hello ladies… today I would like to show you the first shadow box I have made (before it gets all dusty)
If you have not had a chance to look or missed the posting – you can find the second one I made here.

I did get this cute box from my friend Tammi for Christmas and I must say at first I was a bit intimidated by it but honestly once you make one… it is truly addictive. At first I thought the larger ones would be harder to decorate but making 2 I think it would be easier. You could add more images and also I have found the selection of things you could add to the shadow boxes a bit better.

Claudia_Rosa_Ahoj_2

Most of my supplies come from the Tim Holtz range. He is just making so many amazing things! Its really awesome – and a bit expensive lol – I get easily carried away.

If you notice compared to the Spring shadow box tray I did the wording on the wooden frame… this is all done with a tissue tape I found in the Tim Holtz section. I love the effect, because at first you might think its stamped. All you need is patience and a sharp Exacto knife.

Claudia_Rosa_Ahoj_1

Additional supplies:
7 Gypsies Shadow box tray, shadowbox tray
Tilda Ohoj
paper: Websters pages
Embellishments: Stickles, K&Company, charms, Tim Holtz, glitter,
Dies: Magnolia Flag die, Tim Holtz Alterations Alphabet die

Claudia_Rosa_Ahoj_3

Thanks Tammi for the wonderful gift and the challenge!

Tuesday, March 12, 2013

matching sewing utensils pouch

Hello there!
Back with a new posting. I am really sorry I left the last posting so long on the top. It was not intentionally. I got really sick, so my immune system was weak that I caught on top of the flue an other infection and it took me longer to feel better.
I have some brushes made, 2 cards a shadow box and the pouch and just did not even feel well enough to take photos of the things.
But first let me say “thanks” to all of those who left me such wonderful comments on my last posting. It really made me feel so much better and I did try to comment back on your blogs as well. I decided – like you all said just ignore that comment and continue to do my writing in English. What the heck Smile right!!!

Claudia_Rosa_sewing pouch_1

Today I would love to show you the little sewing pouch I made from the last piece of left over fabric from my sewing machine cover. geeezzz… that pouch took me longer (and to be honest needed my husbands help) than the cover for the machine! I had trouble with the “tunnel” to add the pull strings! I just could not envision where to sew. Anyhow.. its done Smile the tassel drawstring was purchased at Joanns in the curtain section and cost more than the pouch and the sewing machine cover all together lol but I like it. Some flowers I sewed on and some of the embellishments as the pearl swirls I glued onto the fabric with fabric glue. The pouch has the right size to hold some of my thread spools, buttons and other things. The image is Magnolia Tilda with sewing machine she can be found in the Summer Memories Collection.

Claudia_Rosa_sewing pouch_2

I have been stuck in the house for more than a week and my local yarn shop sent a email out that they got the new Spring yarns. awwwhhhh… temptation, temptation! The other day I just randomly browsed around to find some inspiration for color combinations in nature and I must say I do like the colors and combinations of the bird! The cactus photo with the orange yarn I just found so cool that I had to save that photo onto my hard drive Smile

photo-3photo-4

I let you go!

Thanks again for all your support.

With love
Claudi

Friday, March 8, 2013

Sewing and stamping–my new sewing machine cover

Hello there… thank you for swinging by.

I was so sick this week I did not craft or spent much time in my craft room at all. Today I went in the room to tidy up a bit and thought I could take at some photos of the sewing machine cover I made for my machine about 2 weeks ago and post the pictures onto my blog.

I know the photos are not great… I did not pull any of my daylight lamps out from the other room and my furniture are all black so the light I get from the window does not reflect very much. Hopefully you still find this posting interesting to still read further and might want to try to make one yourself.Claudia_Rosa_sewing machine cover_4
I was surprised how easy it was to pull this off. I had some extra fabric when my mother in law made for my kitchen curtains. I like the simple but heavier fabric and the colors go nicely with my craft room. I draped the fabric over my machine – measuring the widest and longest point and than from there I just pinned and sewed.

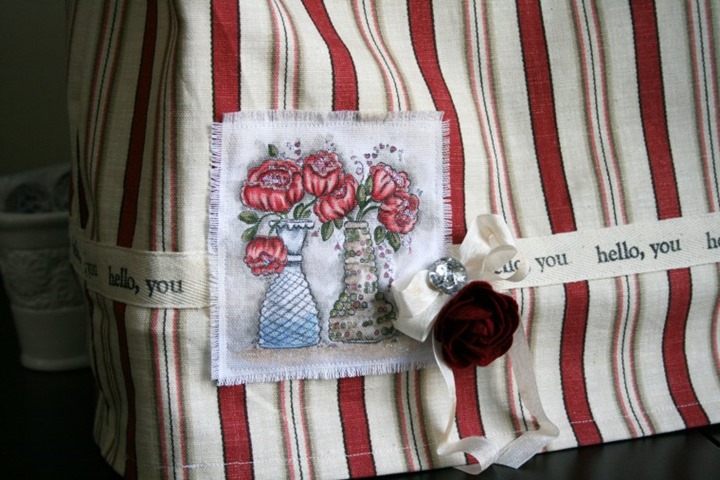
Since the cover does have a left and a right side – I wanted a little focal point image so I know right away what is the front is. I wanted a image that is timeless and pretty… the cute flower vases I found in Magnolias Valentines Collection was just what I was looking for. The image was stamped onto a canvas style fabric with Versa Craft stamp pad and carefully and quickly colored in with Copic markers. I also added some Stickles.. not sure if that would do well if I wash the cover but I don’t care right now about it. I just love the sparkle.
Claudia_Rosa_sewing machine cover_2

Here is a shot to show you what I mean with left and right side – I did not close one seam to the right all the way for the cables. This way the cover slides nicely over the machine and does not sit crooked over it.

Claudia_Rosa_sewing machine cover_5

Here is a shot from the right side.. you can see the box type sewing I did to the corners – when you have your fabric left side just pinch “like” triangles, pin and sew over it – turn fabric inside out and it will look like this.

Oh, I also used some wide cream twine I kept from some Pottery Barn Kids bedding and I stamped all around the twine with a pretty bold lettered sentiment stamp “hello, you” and sewed the ribbon to the front and back horizontally. I kept it simple with additional decorations just some seam binding ribbon in cream with a pretty sparkle button and a deep red felt flower.

Claudia_Rosa_sewing machine cover_3

that’s it. If you are interested in a better explanation how I sewed it.. leave me a comment – I might make a second cover for my friend Tammi (if she likes this one) and I could take some photos and post those to the blog later.

Well… I go and lay for a little while onto the sofa before I have to get my kids from school. I hope you are all well and I see you soon again.
With love

Claudi